Android OpenGL - 02.EGL创建流程及EGL测试

在上一篇的基础上,我们开始进行EGL的初始化。

在初始化之前先写一个工具类 ZqlPlayerLog.h 用户日志打印:

1
2
3
4
5
6
7
8
9
10
11
12
//
// Created by zqlxt on 2020/3/29.
//
#ifndef ZQLPLAYER_ZQLPLAYERLOG_H
#define ZQLPLAYER_ZQLPLAYERLOG_H

#include "android/log.h"

#define LOGD(FORMAT, ...) __android_log_print(ANDROID_LOG_DEBUG,"scott",FORMAT, ##__VA_ARGS__);
#define LOGE(FORMAT, ...) __android_log_print(ANDROID_LOG_ERROR,"scott",FORMAT, ##__VA_ARGS__);

#endif //ZQLPLAYER_ZQLPLAYERLOG_H

接着我们在 cpp 下新建一个名为 egl 的文件夹,用于存放 EGL 初始化相关类。

首先定义头文件 EGLHelper.h :

1
2
3
4
5
6
7
8
9
10
11
12
13
14
15
16
17
18
19
20
21
22
23
24
25
26
27
28
29
30
31
32
//
// Created by zqlxt on 2020/3/29.
//

#ifndef ZQLPLAYER_EGLHELPER_H
#define ZQLPLAYER_EGLHELPER_H

#include "EGL/egl.h"

class EGLHelper {

public:
EGLDisplay mEglDisplay;
EGLSurface mEglSurface;
EGLConfig mEglConfig;
EGLContext mEglContext;
public:
EGLHelper();

~EGLHelper();

//初始化 EGL
int initEGL(EGLNativeWindowType win);
//对 surface 缓存进行交换,用于在 display 上显示画面
int swapBuffers();
//销毁 EGL
void destoryEgl();
};


#endif //ZQLPLAYER_EGLHELPER_H

接着是该头文件对应的实现 EGLHelper.cpp

1
2
3
4
5
6
7
8
9
10
11
12
13
14
15
16
17
18
19
20
21
22
23
24
25
26
27
28
29
30
31
32
33
34
35
36
37
38
39
40
41
42
43
44
45
46
47
48
49
50
51
52
53
54
55
56
57
58
59
60
61
62
63
64
65
66
67
68
69
70
71
72
73
74
75
76
77
78
79
80
81
82
83
84
85
86
87
88
89
90
91
92
93
94
95
96
97
98
99
100
101
102
103
104
105
106
107
108
109
110
111
112
113
//
// Created by zqlxt on 2020/3/29.
//

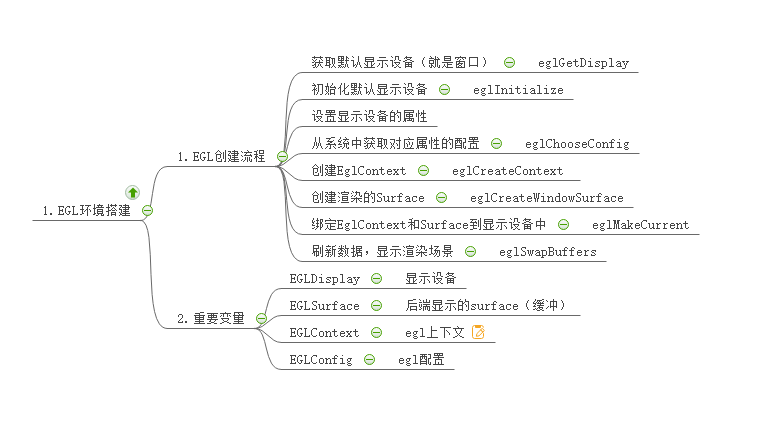
#include "EGLHelper.h"
#include "../log/ZqlPlayerLog.h"

EGLHelper::EGLHelper() {
mEglDisplay = EGL_NO_DISPLAY;
mEglSurface = EGL_NO_SURFACE;
mEglContext = EGL_NO_CONTEXT;
mEglConfig = NULL;
}

EGLHelper::~EGLHelper() {

}

int EGLHelper::initEGL(EGLNativeWindowType win) {
//1. 获取默认显示设备
mEglDisplay = eglGetDisplay(EGL_DEFAULT_DISPLAY);
if (mEglDisplay == EGL_NO_DISPLAY) {
LOGE("eglGetDisplay error")
return -1;
}

//2. 初始化默认显示设备
EGLint *version = new EGLint[2];
if (!eglInitialize(mEglDisplay, &version[0], &version[1])) {
LOGE("eglInitialize error");
return -1;
}

//3. 设置显示设备属性
const EGLint attribs[] = {
EGL_RED_SIZE, 8,
EGL_GREEN_SIZE, 8,
EGL_BLUE_SIZE, 8,
EGL_ALPHA_SIZE, 8,
EGL_DEPTH_SIZE, 8,
EGL_STENCIL_SIZE, 8,
EGL_RENDERABLE_TYPE, EGL_OPENGL_ES2_BIT,
EGL_NONE
};
EGLint num_config;
if (!eglChooseConfig(mEglDisplay, attribs, NULL, 1, &num_config)) {
LOGE("eglChooseConfig error 1");
return -1;
}

//4. 从系统中获取对应属性的配置
if (!eglChooseConfig(mEglDisplay, attribs, &mEglConfig, num_config, &num_config)) {
LOGE("eglChooseConfig error 2");
return -1;
}

//5. 创建 EGLContext
int attrib_list[] = {
EGL_CONTEXT_CLIENT_VERSION, 2,
EGL_NONE
};
mEglContext = eglCreateContext(mEglDisplay, mEglConfig, EGL_NO_CONTEXT, attrib_list);
if (mEglContext == EGL_NO_CONTEXT) {
LOGE("eglCreateContext error");
return -1;
}
//6.创建渲染的surface
mEglSurface = eglCreateWindowSurface(mEglDisplay, mEglConfig, win, NULL);
if (mEglSurface == EGL_NO_SURFACE) {
LOGE("eglCreateWindowSurface error");
return -1;
}

//7. 绑定 EGLContext 和 Surface 到设备显示中
if (!eglMakeCurrent(mEglDisplay, mEglSurface, mEglSurface, mEglContext)) {
LOGE("eglMakeCurrent error");
return -1;
}

LOGD("egl init success");

return 0;
}

int EGLHelper::swapBuffers() {

if (mEglDisplay != EGL_NO_DISPLAY && mEglSurface != EGL_NO_SURFACE) {
if (eglSwapBuffers(mEglDisplay, mEglSurface)) {
return 0;
}
}

return -1;
}

void EGLHelper::destoryEgl() {

if (mEglDisplay != EGL_NO_DISPLAY) {
eglMakeCurrent(mEglDisplay, EGL_NO_SURFACE, EGL_NO_SURFACE, EGL_NO_CONTEXT);
}
if (mEglDisplay != EGL_NO_DISPLAY && mEglSurface != EGL_NO_SURFACE) {
eglDestroySurface(mEglDisplay, mEglSurface);
mEglSurface = EGL_NO_SURFACE;
}
if (mEglDisplay != EGL_NO_DISPLAY && mEglContext != EGL_NO_CONTEXT) {
eglDestroyContext(mEglDisplay, mEglContext);
mEglContext = EGL_NO_CONTEXT;
}
if (mEglDisplay != EGL_NO_DISPLAY) {
eglTerminate(mEglDisplay);
}
}

添加完以上c++方法后不要忘了在CMakeLists中添加相关路径,否则这些文件不会被编译进 lib。

OK,到这一步 EGL 创建流程基本完成,接下来在 Activity 中测试下 EGL 是否可用。

首先定义 NativeOpengl 类,用于与 c++ 层进行交互:

1
2
3
4
5
6
7
8
9
10
11
12
package com.zql.zqlplayer.opengl

import android.view.Surface

/**
* @author 番茄沙司 2020/3/29
*/
public class NativeOpengl {

external fun surfaceCreate(surface: Surface): Unit
external fun surfaceDestory()
}

在对应的 jni 中实现相关方法:

1
2
3
4
5
6
7
8
9
10
11
12
13
14
15
16
17
18
19
20
21
22
23
24
25
26
27
28
29
30
31
32
33
34
#include <jni.h>
#include <string>
#include "log/ZqlPlayerLog.h"
#include "egl/EGLHelper.h"
#include "android/native_window.h"
#include "android/native_window_jni.h"
#include "GLES2/gl2.h"

EGLHelper *eglHelper = NULL;
ANativeWindow *nativeWindow = NULL;
extern "C"
JNIEXPORT void JNICALL
Java_com_zql_zqlplayer_opengl_NativeOpengl_surfaceCreate(JNIEnv *env, jobject thiz,
jobject surface) {

//java 层 SurfaceView 创建完成后,将 surface 对象传入,用于创建 NativeWindow
nativeWindow = ANativeWindow_fromSurface(env, surface);
eglHelper = new EGLHelper();
eglHelper->initEGL(nativeWindow);

//opengl 绘制
glViewport(0, 0, 720, 1280);
glClearColor(0.0F, 1.0F, 0.0F, 1.0F);
glClear(GL_COLOR_BUFFER_BIT);

eglHelper->swapBuffers();
}

extern "C"
JNIEXPORT void JNICALL
Java_com_zql_zqlplayer_opengl_NativeOpengl_surfaceDestory(JNIEnv *env, jobject thiz) {
//java 层 SurfaceView 销毁时调用
eglHelper->destoryEgl();
}

有了以上方法,剩下的就是自定义一个 SurfaceView:

1
2
3
4
5
6
7
8
9
10
11
12
13
14
15
16
17
18
19
20
21
22
23
24
25
26
27
28
29
30
31
32
33
34
35
36
37
38
39
40
41
42
43
44
45
46
package com.zql.zqlplayer.test

import android.content.Context
import android.util.AttributeSet
import android.view.SurfaceHolder
import android.view.SurfaceView
import com.zql.zqlplayer.opengl.NativeOpengl

/**
* @author 番茄沙司 2020/3/29
*/
class EglTestSurfaceView : SurfaceView, SurfaceHolder.Callback {

var nativeOpengl: NativeOpengl? = null

constructor(context: Context) : super(context) {
}

constructor(context: Context, attributeSet: AttributeSet) : super(context, attributeSet) {
}

constructor(context: Context, attributeSet: AttributeSet, defStyleAttr: Int) : super(
context,
attributeSet,
defStyleAttr
) {
}

init {
holder.addCallback(this)
}

override fun surfaceChanged(holder: SurfaceHolder?, format: Int, width: Int, height: Int) {

}

override fun surfaceDestroyed(holder: SurfaceHolder?) {
nativeOpengl?.surfaceDestory()
}

override fun surfaceCreated(holder: SurfaceHolder?) {
holder?.surface?.let {
nativeOpengl?.surfaceCreate(it)
}
}
}

以及 Activity:

1
2
3
4
5
6
7
8
9
10
11
12
13
14
15
16
17
18
19
20
21
package com.zql.zqlplayer.test

import android.os.Bundle
import android.support.v7.app.AppCompatActivity
import com.zql.zqlplayer.R
import com.zql.zqlplayer.opengl.NativeOpengl

import kotlinx.android.synthetic.main.activity_e_g_l_test.*

class EGLTestActivity : AppCompatActivity() {

private val nativeOpengl = NativeOpengl()

override fun onCreate(savedInstanceState: Bundle?) {
super.onCreate(savedInstanceState)
setContentView(R.layout.activity_e_g_l_test)
surface_view.nativeOpengl = nativeOpengl
}

}

最后的运行效果如图: